GooglePrettify

2017年3月31日 星期五

Visual Studio shortcut : Comment and Uncomment Code

Keyboard:  CTRL + K, CTRL + C (comment); CTRL + K, CTRL + U (uncomment)
Menu:  Edit -> Advanced -> Comment Selection; Edit -> Advanced -> Uncomment Selection
Command:  Edit.CommentSelection; Edit.UncommentSelection
Versions:  2008,2010
Published:  4/13/2010
Code:  vstipEdit0047

Download the seriously cool Tip of the Day Extension to get the daily tips delivered to your Start Page!

Sometimes it’s the simple stuff we forget about.  So I present to you the classic Comment and Uncomment Selection.  Naturally, you have the Comment and Uncomment buttons:
image

And, of course, we have the Menu items:
image

But it’s the keyboard shortcuts that really rock!  These will, predictably, comment or uncomment lines of code for you.  So, let’s say you have some code you want commented out.  Just select it:
image

Then press CTRL + K, CTRL + C (in this example):
image

Voila!  It’s commented out.  Okay, great, but what if you don’t want to use the mouse?  No problem!  Just hold ALT + SHIFT + [UP or DOWN ARROW] to do a vertical selection (NOTE:  In VS2008 you have to go right or left one character before you can go up or down for vertical selection):
image

Then press CTRL + K, CTRL + U (in this example):
image

And there you go!  Comment and Uncomment actions anytime you want!

from : https://blogs.msdn.microsoft.com/zainnab/2010/04/13/comment-and-uncomment-code/

Correct way to unit test the type of an object

 Assert.AreEqual(typeof(MyObject), obj.GetType());

from : http://stackoverflow.com/questions/22362634/correct-way-to-unit-test-the-type-of-an-object

2017年3月20日 星期一

一秒看懂SQL Server 2008日期时间类型区别

一开始学习数据库的基本数据类型,都为其数据类型的种类搞晕。为什么数据库需要那么多的数据类型,一个时间也可以分出6中数据类型。显然老微不是吃饱了撑着。这么做肯定是有目的的。假设当你的公司需要存储超过100万条数据,我们就假设使用int和bigint,int占空间是4字节表示范围是-2^31~2^31-1,也就是32位数据。bigint则是8字节,63位数据,假设我们在使用int足够存储的情况下,某位新用户设置为bigint类型进行存储,那么100万*4字节=3.814697265625MB。现在你也许会觉得不到4M的空间不足以考虑,好,那么我们数据是10亿条呢,而且数据中不可能就只有一列把3.8M*100*N=380M+。废话不多说,把类型分的那么细是肯定有原因的。 

让我们从最难的数据类型开始(我觉得是)

日期时间类型

date

time

datetime

datetime2

smalldatetime

datetimeoffset

[code]DATE
2015-12-01

TIME
09:25:09.2670000

DATETIME
12  1 2015  9:25AM

DATETIME2可以设置精度
DATETIME2
2015-12-01 09:25:09.2670000

DATETIME2(5)
2015-12-01 09:25:09.26700

SMALLDATETIME
12  1 2015  9:25AM

DATETIMEOFFSET
2015-12-01 09:25:09.2670000 +00:00


这是输出上面的源码

[code]DECLARE @dt AS DATE
SET @dt=GETDATE()
PRINT 'DATE';
PRINT @dt;
/*2015-12-01*/

DECLARE @dt2 AS TIME
SET @dt2=GETDATE()
PRINT 'TIME';
PRINT @dt2;
/*09:12:53.7830000*/

DECLARE @dt3 AS DATETIME
SET @dt3=GETDATE()
PRINT 'DATETIME';
PRINT @dt3;
/*12  1 2015  9:13AM*/

PRINT 'DATETIME2可以设置精度';
DECLARE @dt4 AS DATETIME2
SET @dt4=GETDATE()
PRINT 'DATETIME2';
PRINT @dt4;
/*2015-12-01 09:16:03.6300000*/

DECLARE @dt5 AS DATETIME2(5)
SET @dt5=GETDATE()
PRINT 'DATETIME2(5)';
PRINT @dt5;
/*2015-12-01 09:16:03.63000*/

DECLARE @dt7 AS SMALLDATETIME
SET @dt7=GETDATE()
PRINT 'SMALLDATETIME';
PRINT @dt7;
/*12  1 2015  9:18AM*/

DECLARE @dt8 AS DATETIMEOFFSET
SET @dt8=GETDATE()
PRINT 'DATETIMEOFFSET';
PRINT @dt8;
/*2015-12-01 09:18:54.5770000 +00:00*/


总结以上,date表示日期,time表示时间,datetime时间+日期 

datetime2[(n)]是精度可以改变的时间+日期,当然是指改变时间的精度啦。smalldatetime的结果类似于datetime,但是还是有区别的。 

smalldatetime的有效时间范围1900/1/1~2079/6/6 

datetime的有效时间范围1753/1/1~9999/12/31, 

smalldatetime精确到分钟,datetime精确到3.33ms。

from : http://www.lai18.com/content/9993824.html

2017年3月15日 星期三

RhinoMocks stub out parameter

Ouch, pained my brain over this one for the last half hour or so, but finally found the solution.
I had a call similar to:
repository.Stub(x => x.TryGet(  
    Arg<Specification>.Matches(y => y.Something),
    out Arg<Customer>.Out(customerToReturn).Dummy))
.Return(true);
Because my first argument had a fairly large Matches call (it's simplified here), I refactored it to:
var specification = Arg<Specification>.Matches(y => y.Something);  
repository.Stub(x => x.TryGet(  
    specification, 
    out Arg<Customer>.Out(customerToReturn).Dummy))
.Return(true);
Ah, much more readable! Only, it didn't work. The exception I got was:
Use Arg<T> ONLY within a mock method call while recording. 2 arguments expected, 3 have been defined.
I could not for the life of me see where I was defining three arguments. I was looking at the second argument (the out argument) because that was the more exotic of the two.
I finally realized the exception message is actually rather correct. You have to use Arg inside the method you're stubbing. So you can't refactor like I did. I had to leave the call as it was:
repository.Stub(x => x.TryGet(  
    Arg<Specification>.Matches(y => y.Something),
    out Arg<Customer>.Out(customerToReturn).Dummy))
.Return(true);
I hope this saves you (and me!) some time in the future (as the few posts I found focus on the fact that the method has to be virtual, which doesn't help if you're stubbing an interface).

from : http://www.petermorlion.com/rhino_mocks_and_use_arg_t_only_within_a_mock_method_call_while_recording_exception/

2017年3月5日 星期日

C#: Using Microsoft Unity dependency injection in Unit Tests

After working with Ninject and Windsor for a while I finally faced Microsoft Unity dependency injection container. And here is the way to build up an infrastructure for Unity container to use it for example in Unit tests.
Lets take a look at the solution structure:

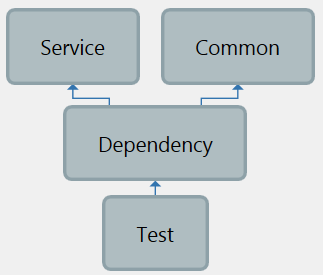
Service project contains services.
Common project apart from common interfaces contains service locator implementation.
Dependency project contains Unity configuration and registration classes.
Test project contains unit tests for service layer.
For this particular case there will be only one service in Service project:
01public interface IFooService
02{
03    string Bar();
04}
05 
06public class FooService: IFooService
07{
08    public string Bar()
09    {
10        return "Bar";
11    }
12}
In order to be able to swap between different DI containers and just for decoupling we define two interfaces in Common project
01// Common service locator interface
02public interface IServiceLocator
03{
04    T Get<T>();
05}
06 
07// Common DI container registration module interface
08public interface IContainerRegistrationModule<T>
09{
10    void Register(T container);
11}
IContainerRegistrationModule will come in handy later and now we can define common service locator for any type of DI container:
01public abstract class DependencyInjectionServiceLocator<TContainer> : IServiceLocator
02{
03    // DI container
04    protected TContainer Container { getprivate set; }
05 
06    protected DependencyInjectionServiceLocator(TContainer container)
07    {
08        Container = container;
09    }
10 
11    public virtual T Get<T>()
12    {
13        return Get<T>(Container);
14    }
15 
16    // Get service instance based on container specific logic
17    protected abstract T Get<T>(TContainer container);
18}
And specific service locator for Unity container:
01// Service locator based on Unity DI container
02 public class CustomUnityServiceLocator : DependencyInjectionServiceLocator<IUnityContainer>
03 {
04     public CustomUnityServiceLocator(IUnityContainer container)
05         base(container)
06     { }
07 
08     // Override base method in order to get service instance based on container specific logic
09     protected override T Get<T>(IUnityContainer container)
10     {
11         return this.Container.Resolve<T>();
12     }
13 }
Common project is done, moving on to Dependency project. Here we need to define two classes for later usage. First one is registration module where all dependencies will be registered.
01public class UnityRegistrationModule : IContainerRegistrationModule<IUnityContainer>
02{
03    // Register dependencies in unity container
04    public void Register(IUnityContainer container)
05    {
06        // register service locator
07        container.RegisterType<IServiceLocator, CustomUnityServiceLocator>();
08 
09        // register services
10        container.RegisterType<IFooService, FooService>();
11    }
12}
And the specific configuration module for Unity:
01public class UnityConfig
02   {
03       private static readonly Lazy<IUnityContainer> Container = newLazy<IUnityContainer>(() =>
04       {
05           var container = new UnityContainer();
06           RegisterTypes(container);
07           return container;
08       });
09 
10       public static IUnityContainer GetUnityContainer()
11       {
12           return Container.Value;
13       }
14 
15       public static void RegisterTypes(IUnityContainer container)
16       {
17           var registrationModuleAssemblyName = System.Configuration.ConfigurationManager.AppSettings["UnityRegistrationModule"];
18 
19           var type = Type.GetType(registrationModuleAssemblyName);
20 
21           var module = (IContainerRegistrationModule<IUnityContainer>)Activator.CreateInstance(type);
22 
23           module.Register(container);
24       }
25   }
Now you can initialize the container like this:
1var unityContainer = UnityConfig.GetUnityContainer()
Upon calling GetUnityContainer() method new instance of UnityContainer will be initialized, our UnityRegistrationModule will be created and it will register the dependencies.
Notice that UnityRegistrationModule is created via Activator and the assembly and type name added into the App.config configuration file in Test poject:
1<?xml version="1.0" encoding="utf-8" ?>
2<configuration>
3   <appSettings>
4 
5     <add key="UnityRegistrationModule"value="Dependency.UnityRegistrationModule, Dependency, Version=1.0.0.0, Culture=neutral, PublicKeyToken=null" />
6 
7  </appSettings>
8</configuration>
Finally lets move on to the Test project. First of all lets define the base test class:
01[TestClass]
02  public class TestBase
03  {
04      private static IUnityContainer _unityContainer = null;
05      private static IServiceLocator _serviceLocator = null;
06 
07      private static IUnityContainer UnityContainer
08      {
09          get return _unityContainer ?? (_unityContainer = UnityConfig.GetUnityContainer()); }
10      }
11 
12      private static IServiceLocator ServiceLocator
13      {
14          get return _serviceLocator ?? (_serviceLocator = UnityContainer.Resolve<IServiceLocator>()); }
15      }
16 
17      protected TService GetService<TService>()
18      {
19          return ServiceLocator.Get<TService>();
20      }
21  }
Here we initialize unity container, resolve service locator and define GetService method.
And finally lets create some unit tests:
01[TestClass]
02public class UnitTest1 : TestBase
03{
04    [TestMethod]
05    public void TestMethod1()
06    {
07        var service = this.GetService<IFooService>();
08        var result = service.Bar();
09        Assert.IsTrue(result.Length > 0);
10    }
11}
And here it is - FooService successfully resolved using Unity container and our custom service locator.
Download source code here

from : http://gentlelogic.blogspot.tw/2014/12/c-using-microsoft-unity-dependency.html